WordPress vs. DNSExit vs. Cloudflare for DNS Management:
The recent move by Google to abandon their web domains division, selling their clients away to Squarespace without so much as a “by your leave, m’lord”, led to a decision to move my domain registry over to WordPress.
Why WordPress, and not Squarespace?
Well, I just didn’t like the way that deal happened. And I found the Squarespace site confounding to parse, and nail down pricing for services.
At WordPress, they made a generous offer for a free year’s hosting, and their rate matched the Goog’s $12/year per domain thereafter. They even rolled over my remaining paid months from Google, so I don’t owe them anything until summer of 2025! Nice!
But for all that economy, the migration was annoying on a number of counts.
So, what’s wrong with WordPress DNS?
First, the management of DNS at WordPress proved frustrating for a couple of reasons. I discovered that lengthy TXT records, like the 2048 bit DKIM record couldn’t be used there because of a Record limit of 255 characters. Really?! So I wasted an hour recomposing down to a 1024 bit DKIM record.
Wasted because I discovered that WordPress DNS had no means to accommodate Dynamic DNS updates. This was a total deal-breaker! All my effort at migrating DNS was a loss. I’d do better watching reruns of ‘Between Two Ferns’. I can’t imagine a DNS management host not covering that need!
The bottom line: WordPress is a good domain registry. And while very good at web hosting and support for their open-source content management tools… Well, they kind of suck at domain hosting and DNS tools.
DNSExit and Cloudflare:
For almost 15 years prior to moving my domain registry to Google, I managed DNS at DNSEXIT.com. And I’ve got to say, they were pretty fine in all respects. They have always offered a free DDNS api capable of updating an IP change, and email spooling to provide coverage for a downed email server.
I’ve also looked into and tried Cloudflare’s DNS hosting, and was impressed at the features they offer. Beyond their DDNS api, they permit crafting custom api’s for other needs. They also provide data caching to reduce your server loads, and proxied A, AAAA, and CNAME records, which allows Cloudflare to cache and guard requests to your site, and interdict DDoS attacks.
Both DNSExit and Cloudflare have free basic plans for DNS management. DNSExit is, if you ask me, the simpler and more intuitive to use, but then I did manage DNS with them for a very long time. They excel at email backup and related services. Cloudflare is more advanced at the scope of DNS services they offer, and hence has a steeper learning curve to implement them, but is well worth the effort.
Both are good choices moving forward if, like me, you’ve been expelled from the Goog’s domain!
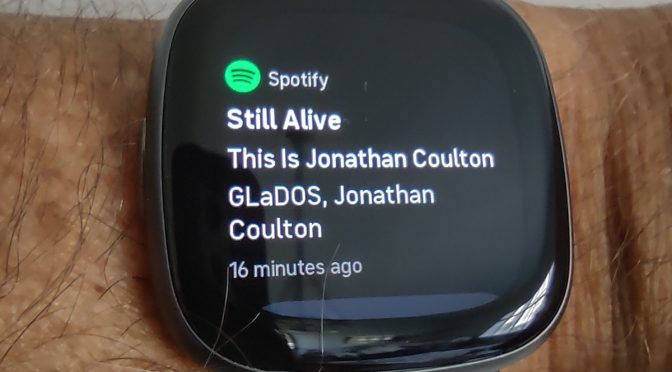
I just got a Fitbit Versa 4 wrist band, and was disappointed to hear the online consensus that it wouldn’t permit me to “use” a music app (or other non-proprietary apps, for that matter!). The stated reason was that Fitbit didn’t open the model to outside developers. This was surprising to me because my previous Fitbit Alta HR could control Spotify from the wristband.
Long story short, I was misinformed, because the Versa 4 does a good job controlling Spotify from the wristband if you configure the device correctly and know how to navigate the wristband. I discovered this by trial and error after a fruitless search for help on the internet.
True, it is limited and cannot control music selection, as you can on some smart watches, but you are able to Stop, Restart, Skip Forward, Play Previous, and ‘Like’ the tracks you play in Spotify from the app running on your Android phone.
Here are the steps that I found:
First, configure your Versa 4 to report Spotify notifications. You do this as follows:
In the Fitbit app on your phone, navigate to your Account settings by tapping on your picture/avatar in the upper-left corner of the screen. Then select the Versa 4 device. On that page, tap on Notifications. On the Notifications page, select App Notifications. Now scroll down the list of apps on your phone, and check Spotify.
Now your Versa 4 can respond to Spotify when it’s running on your phone!
To control Spotify from the wristband, you must first open Spotify on your phone, and start some music playing.
Next, as the track is playing, simply pause it on the phone!
You should immediately get a notification on your wristband identifying the album and artist. If you tap on the notification, it expands into a scrolling menu with choices for Like, Previous Track, Play, and Next Track. All these choices work as expected. Tap on ‘Play’, and the track should resume playing. If you tap on ‘Play’ after that, the track will pause.
There are two additional choices in the list:
If you tap on ‘Close’, the notification is removed from your notifications list, and you will need to go back to you phone to pause or re-start your music, which should send another Spotify notification to the wristband.
If you tap on ‘Open’, the wristband buzzes, and reports ‘Link Sent’. This serves to reopen the Spotify app on your phone to the album or cut you are currently playing.
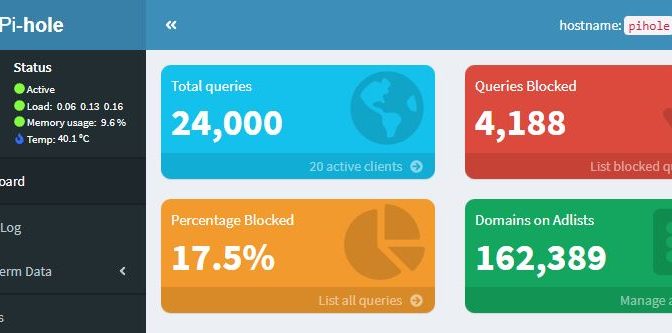
For the uninitiated, PiHole is a way to scrub lots of ads AND improve the privacy of all devices using your internet provider at home. It’s a service most people run from a small, dedicated Raspberry Pi computer which you host on the network.
It does this by filtering all DNS queries on your network through a list of known advertising sites, and blocking those advertisers from placing ads on the webs you surf. It also blocks a good deal of monitoring of your devices by external webs spying on your devices at home. It lets you monitor which of your devices at home are most affected by “rogue dns hogs”, which can give you a heads-up on computers at home that may be compromised by malware. PiHole is also capable of managing DHCP IP address assignments on your network, and has other useful tools baked in. It’s really a terrific addition to your home network, and a good way to use any stray Raspberry Pi you have lying around.
There are very good how-to pages on setting up Raspberry Pi systems, and installing PiHole on them, but this post is not about that. We’re here to supply specific notes on implementing PiHole most effectively on a network using a router running the Fresh Tomato firmware.
Fresh Tomato routers, because of their complex configurations, have confounded numerous PiHole users; me among them. The page at this link reviews three different methods to make ad-blocking work in PiHole. Method 2 has advantages over the others, but the notes (derived from a different router firmware) don’t really show what to do in Fresh Tomato routers. The notes below worked for me to solve the problem. Here’s my configuration for PiHole with a Fresh Tomato router. (Asus RT-AC66W running Fresh Tomato 2022.3, and PiHole v5.14.1, running on an old RPi-2 and Raspian Lite.)
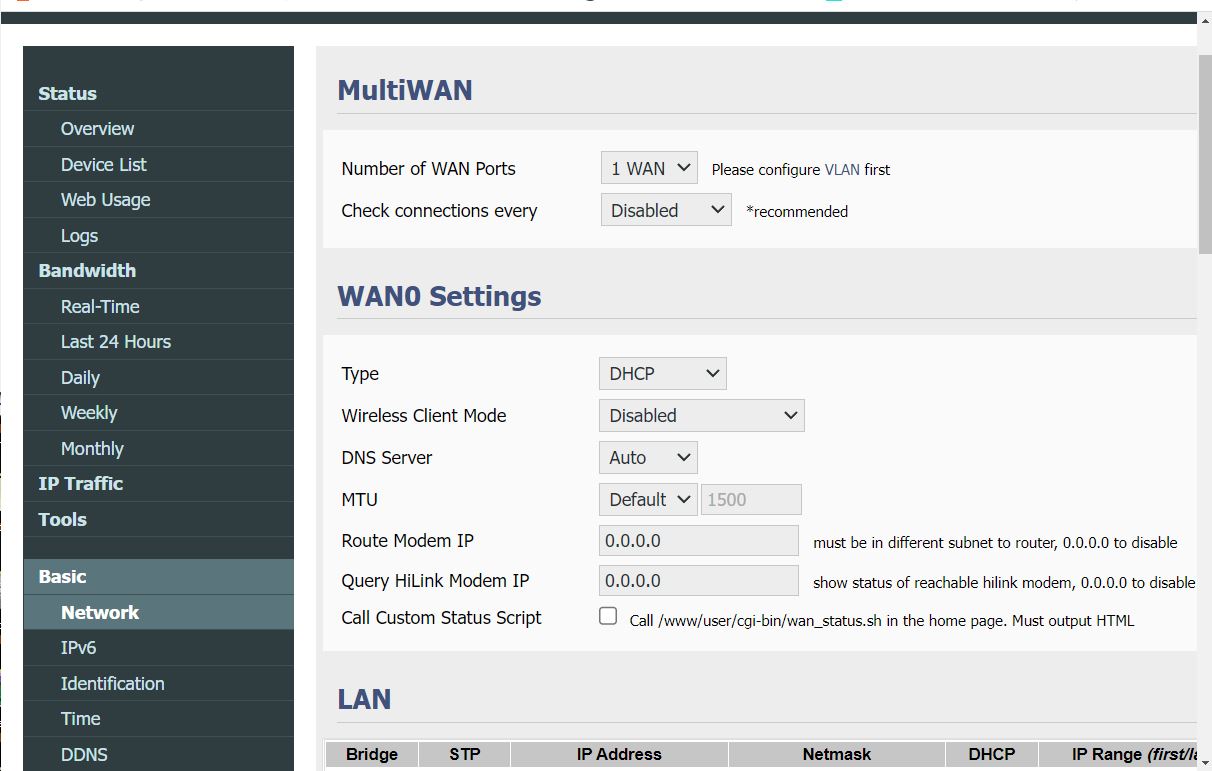
On the router:
Go to Basic: Network: WAN0 Settings: DNS Server , and set DNS Server to ‘Auto’. Click Save at the bottom of the page.
Next:
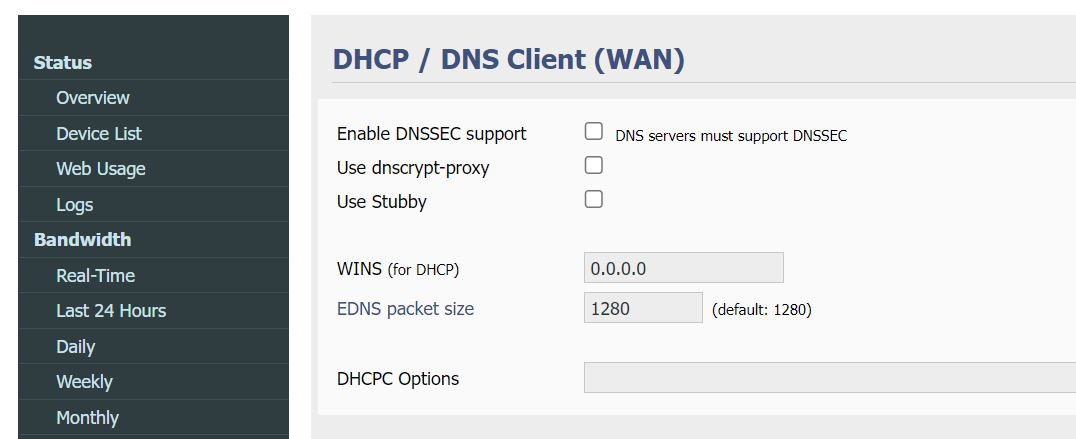
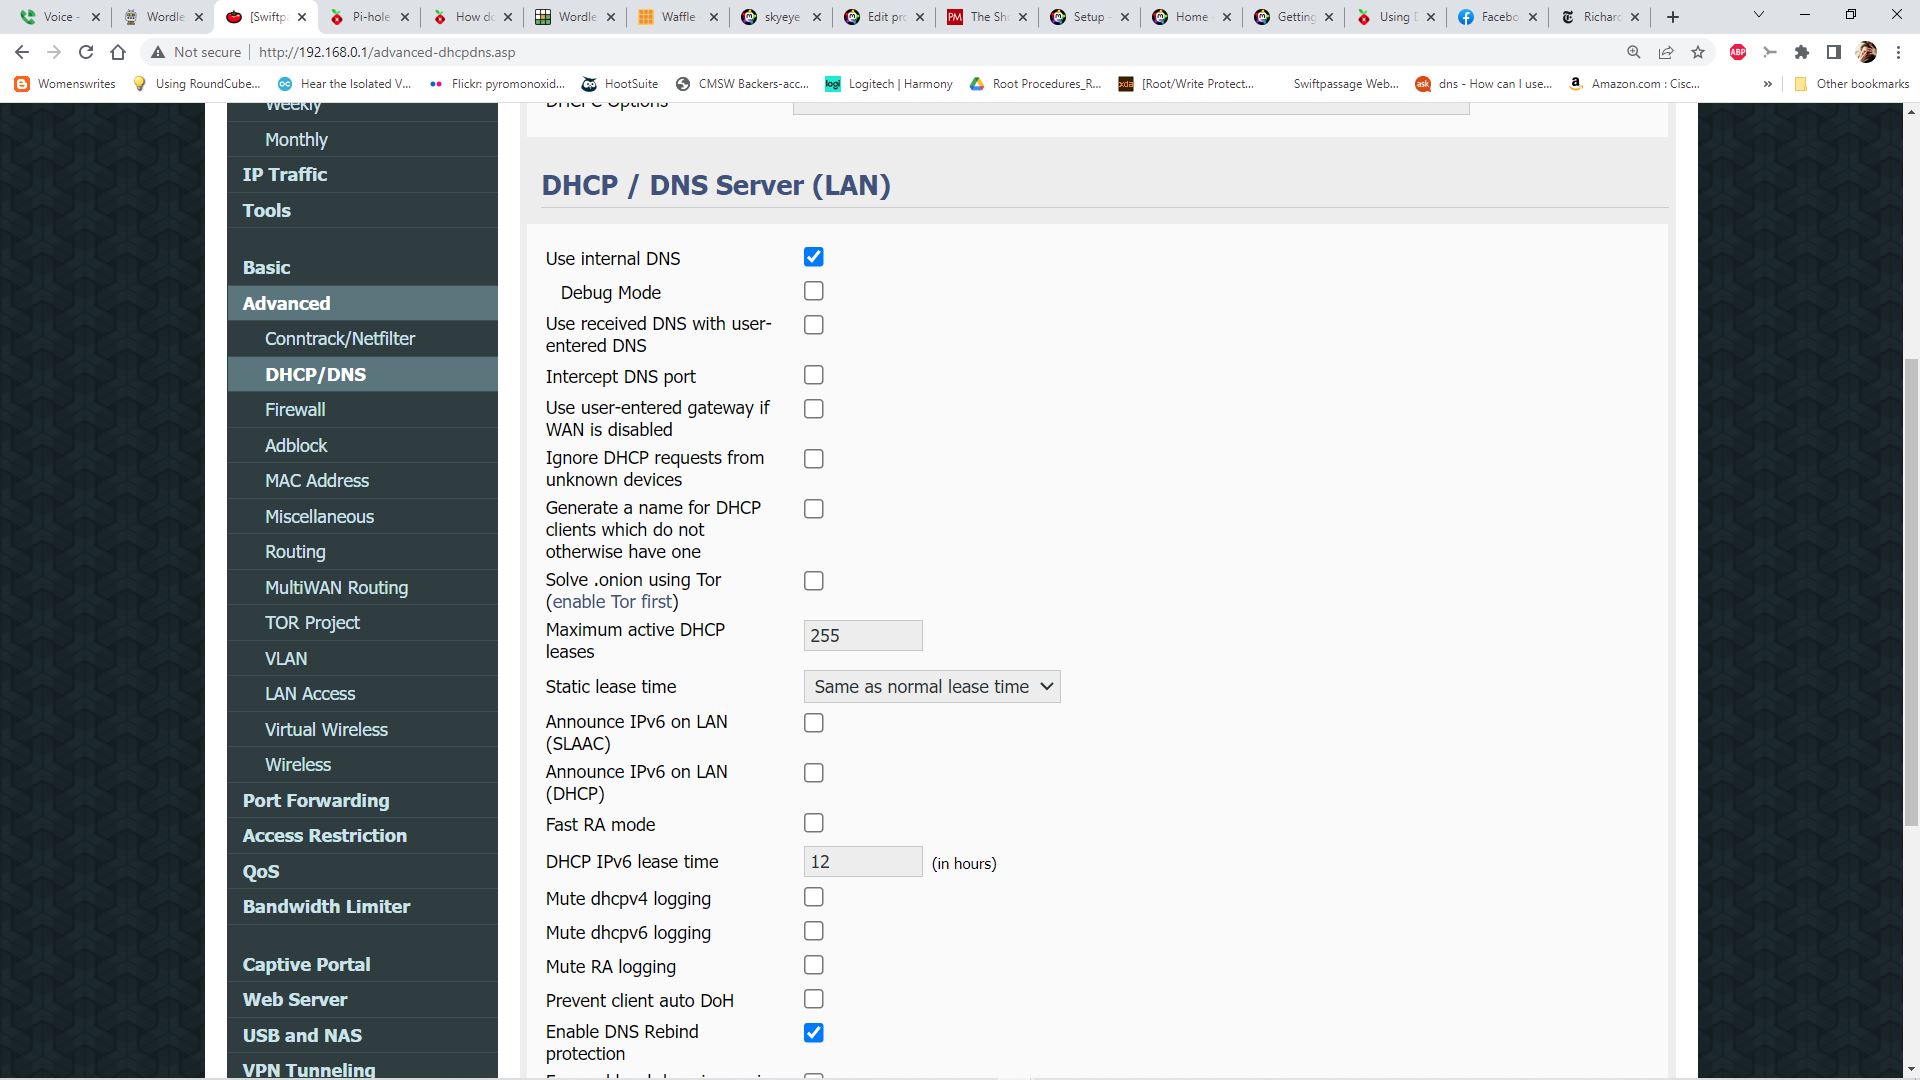
Go to Advanced: DHCP/DNS: DHCP/DNS Client (WAN), and uncheck ‘Enable DNSSEC’, uncheck ‘Use dnscrypt-proxy’, and uncheck ‘Use Stubby’.
Further down, find DHCP/DNS Server (LAN), and check ONLY ‘Use Internal DNS’ and ‘Enable DNS Rebind protection’.
In the area for ‘dnsmasq – custom configuration’, Enter the following:
‘ dhcp-option=6,<ip of your pihole system>’ . Ours is as you see below:
Click on Save.
Then, in PiHole:
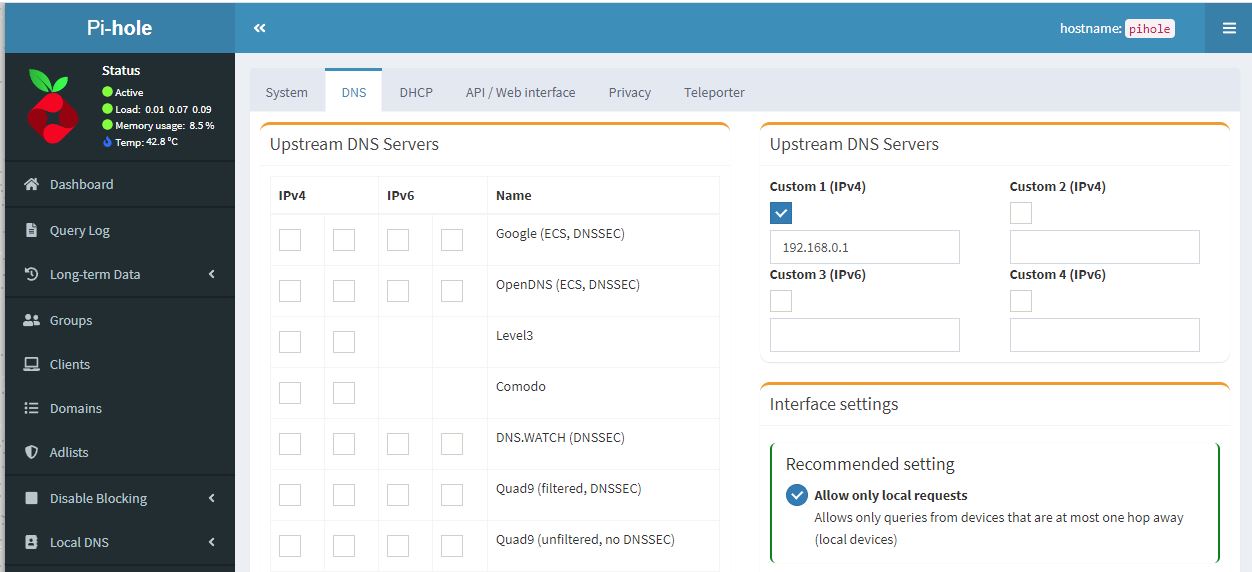
Go to ‘Settings’ and click on the DNS tab :
At Upstream DNS Servers, Custom 1 (IPv4) enter your in-network router IP address.
Check the recommended setting: ‘Allow only local requests’. (If your network is secured behind a firewall, the other choices may be acceptable.)
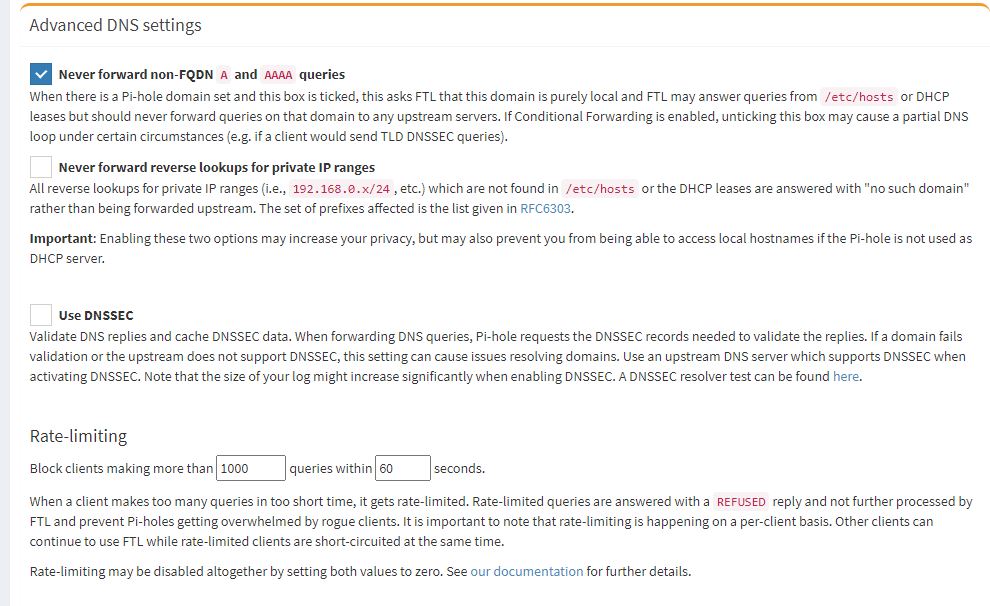
Advanced DNS settings-
Check ‘Never forward non-FQDN A and AAAA queries’.
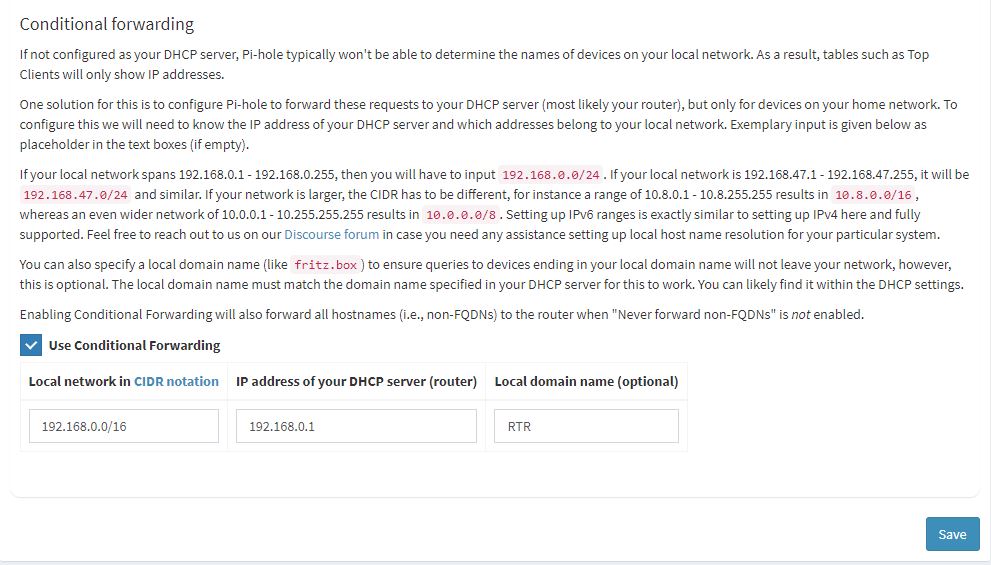
Check ‘Use Conditional Forwarding’.
Enter your Local Network in CIDR notation, and the IP address of your DHCP server (router).
Click Save
I was very surprised that there was no need to enter anything beyond ‘Auto’ as noted for DNS Server on the router’s Basic page.
On your Windows client computers, review the DNS server settings for the network device, and set to default.
I spent considerable time trying to enable DNSSEC on the router, and in pihole, but it only broke things. If you have any insight on THAT problem, please post in the comments, and I’ll try to make it work, and add it here!
It is VERY helpful to view the query log while fiddling with these settings.
Most of my friends know that as a side-line I narrate books for Audible.Com, and they might also know that I’m a Linux nerd, too. Where those interests intersect, there is a wonderful open-source program called Audacity, which is a Digital Audio Workshop, that is, a program in which you can record, edit and master digital audio. Musicians, narrators and voice-over professionals use such programs every day. Audacity, in addition to being jammed with features and options, is free. It’s the very tool to reach for if you are a dabbler, or on a constrained budget, but serious about doing good work.
Unfortunately, Audacity lacks one capability which narration and voice-over, in particular, makes heavy use of, and that is a tool called “punch and roll”. “Punch and Roll” allows an audio book narrator to edit mistakes “on the fly” while reading. It works like this: the reader hears himself flub a line or a pronunciation, stops recording, places the start-point line just upstream from the mistake, and hits “punch and roll”. Then these things happen automatically: the start-point jumps upstream an additional pre-set number of seconds (2-3 seconds are typical), the system starts playing the audio for the narrator to hear. As the time-line reaches the marked “flub-point”, the system stops playing, and begins to record. The narrator picks up reading, correcting the error, and the recording proceeds, as before, with the edited audio right where it belongs.
Ideally, the program should preserve both the original audio (the one containing the error), as well as the corrected stream. That may sound odd, I know, but is no less true. It doesn’t happen often, but it can be very important at times to have the original stream of audio, to fix subtle issues found much later on. Being able to revert to the original version with the tool is called “non-destructive punch and roll”.
So, how can we do all this in Audacity? First know this: the Audacity DAW has versions that run in Windows and Mac, as well as Linux, and there have been a few clever people who have solved this problem for those systems already. My “punch and roll” solution for Audacity in Linux has been adapted from a solution posted by Steven Jay Cohen which works in Mac OSX. Cohen’s written a short piece of code that runs in AppleScript, to execute the correct keystrokes to allow non-destructive punch & roll in Audacity on a Mac. A bit of googling will also locate scripts that will achieve similar results using “AutoHotKey” on Windows computers. My solution for linux makes use of a powerful macro utility called “autokey”, which runs scripts in the python programming language.
Here’s how to obtain punch and roll in Audacity on an Ubuntu/Debian linux computer:
1. Install autokey. On a gnome-ubuntu machine, from the command line run:
sudo apt-get install autokey-gtk
2. From the desktop, launch the program menu, then Accessories, AutoKey. This should open the Main Window of autokey, and also place the autokey icon, a capital “A”, in your program tray.
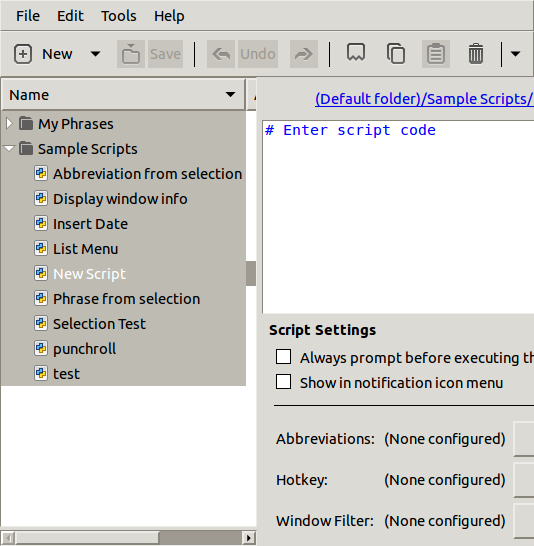
The main window looks like this:
AutoKey Main Window
Now you are going to add a new script to the existing library you see on the left side of the main window. Do these:
1. Click where you see “+New”, choose Script from the menu, then give your script an appropriate name in the dialogue box. I called mine Punch&Roll.
2. Notice on the right side the box where you will input and edit your script. It’s marked # Enter script code:
#Enter Script Code
blogYou will be pasting the code right below where you see:
# Enter script code
For those of you unused to working with programs, understand that where you see a hashtag (#) at the beginning of a line, the computer ignores that line when running the program. If you are modifying this script to troubleshoot it, you could insert a hashtag at the start of a line to remove it temporarilly from the program, or to create a note for yourself about what the next line is supposed to do.
Here’s the script that works for me. It sets 3 seconds of pre-roll:
## Autokey script to enable Non-Destructive Punch&Roll
##in Audacity using AutoKey.
# BEGIN SCRIPT
keyboard.send_keys(“<shift>+k”)
keyboard.send_keys(“z”)
keyboard.send_keys(“<ctrl>+x”)
keyboard.send_keys(“<enter>”)
keyboard.send_keys(“<ctrl>+b”)
keyboard.send_keys(“?”)
keyboard.send_keys(“<enter>”)
keyboard.send_keys(“<enter>”)
keyboard.send_keys(“<up>”)
keyboard.send_keys(“<enter>”)
keyboard.send_keys(“<ctrl>+v”)
keyboard.send_keys(“<enter>”)
keyboard.send_keys(“<up>”)
keyboard.send_keys(“<enter>”)
#The number of “,” below sets 3 seconds of pre-roll.
keyboard.send_keys(“,”)
keyboard.send_keys(“,”)
keyboard.send_keys(“,”)
#Below, (” “) encloses one press of the space-bar.
keyboard.send_keys(” “)
#Number for time.sleep below should equal number of (“,”).
time.sleep(3)
keyboard.send_keys(“<shift>+a”)
#Delay for sleep below makes resume-record work.
time.sleep(1)
keyboard.send_keys(“<shift>+r”)
#END OF SCRIPT
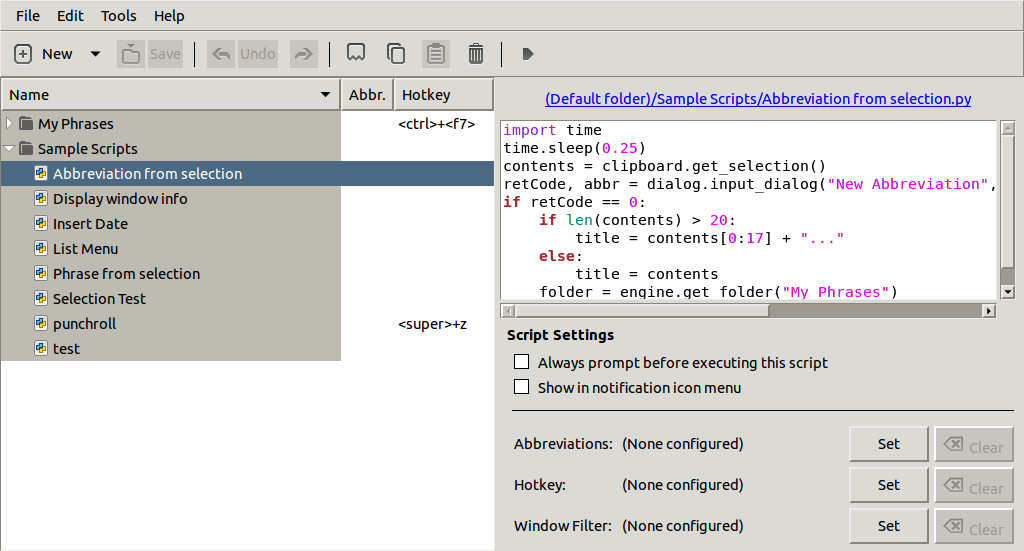
After copying this into the script editing box in autokey, do three more steps:
1. Set a hot key for the script, by clicking on the button below the script marked HotKey….Set. Then in the dialogue box that opens, click on “Press to Set”. Choose a hot-key combination that doesn’t conflict with any other program or function: I recommend a combination of the <super> key (also called the <windows> key) and the “z” key. So press and hold <super> and then press “z”. Then press Ok. You should see <super>+z has been set as your hot key.
2. It’s wise to set a Window Filter, so that your hot key will only be activated within Audacity. Where it says Window Filter, press Set. In the dialogue box where it says “Regular expression to match”, type in Audacity.Audacity , just like that.
3. Lastly, save your work: Click up above where it says Save, or simply press Ctrl-s.
Now, to use “punch and roll”, you need to set up Audacity very specifically for the script. It expects you will have two mono tracks above a label (bookmark) track. Audacity will launch a new track as soon as you begin recording, so I do these steps to get started:
1. Make sure AutoKey is running in the background (the “A” shows in the tray below on the right side). Now launch Audacity, and make a short recording of 5-8 seconds.
2. Press “Ctrl-Shift-n” to make a second mono track below the first.
3. Press “Ctrl-b” to make the label track.
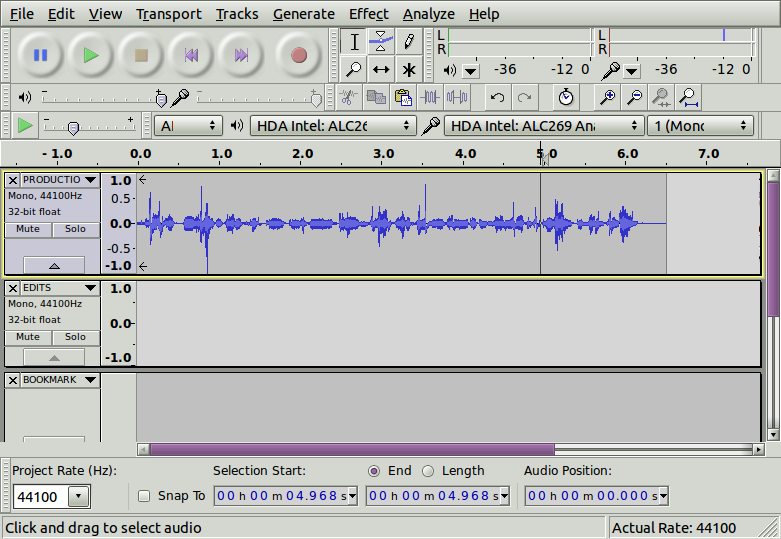
The top-most track is your production track. The next one down is your Edits track and will accumulate your saved mistakes as you stop, set, and then punch/roll to fix “flubs” on the fly. It should look something like this:
Set up these tracks: Production, Edits, Bookmarks
To try it, you need to start with the time-marker set within the short piece of audio you recorded to launch the production track.
1. Put it near the end, but not all the way at the end.
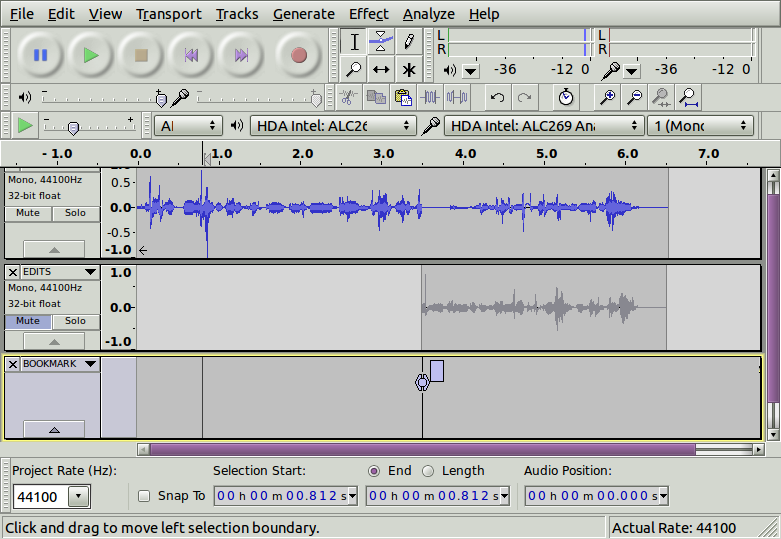
2. Press <super>+z, and you will see the time marker jump back 3 seconds, play those three seconds, and then append a new recording to the production track as it reaches where you started.
You will also notice that all audio AFTER your start point will have been moved to the second audio track, where it will be saved, in case it’s needed to fix something. Here’s what it should resemble:
After one “punch and roll”. Notice that my Edits track is muted, so it doesn’t distract me as I re-record.
So there you have it! Non-destructive punch and roll for Audacity in Linux. My deep appreciation to Steven Jay Cohen for his excellent post explaining this process for Macs, without which this technique would still be a mystery to me.