![]() Most of my friends know that as a side-line I narrate books for Audible.Com, and they might also know that I’m a Linux nerd, too. Where those interests intersect, there is a wonderful open-source program called Audacity, which is a Digital Audio Workshop, that is, a program in which you can record, edit and master digital audio. Musicians, narrators and voice-over professionals use such programs every day. Audacity, in addition to being jammed with features and options, is free. It’s the very tool to reach for if you are a dabbler, or on a constrained budget, but serious about doing good work.
Most of my friends know that as a side-line I narrate books for Audible.Com, and they might also know that I’m a Linux nerd, too. Where those interests intersect, there is a wonderful open-source program called Audacity, which is a Digital Audio Workshop, that is, a program in which you can record, edit and master digital audio. Musicians, narrators and voice-over professionals use such programs every day. Audacity, in addition to being jammed with features and options, is free. It’s the very tool to reach for if you are a dabbler, or on a constrained budget, but serious about doing good work.
Unfortunately, Audacity lacks one capability which narration and voice-over, in particular, makes heavy use of, and that is a tool called “punch and roll”. “Punch and Roll” allows an audio book narrator to edit mistakes “on the fly” while reading. It works like this: the reader hears himself flub a line or a pronunciation, stops recording, places the start-point line just upstream from the mistake, and hits “punch and roll”. Then these things happen automatically: the start-point jumps upstream an additional pre-set number of seconds (2-3 seconds are typical), the system starts playing the audio for the narrator to hear. As the time-line reaches the marked “flub-point”, the system stops playing, and begins to record. The narrator picks up reading, correcting the error, and the recording proceeds, as before, with the edited audio right where it belongs.
Ideally, the program should preserve both the original audio (the one containing the error), as well as the corrected stream. That may sound odd, I know, but is no less true. It doesn’t happen often, but it can be very important at times to have the original stream of audio, to fix subtle issues found much later on. Being able to revert to the original version with the tool is called “non-destructive punch and roll”.
So, how can we do all this in Audacity? First know this: the Audacity DAW has versions that run in Windows and Mac, as well as Linux, and there have been a few clever people who have solved this problem for those systems already. My “punch and roll” solution for Audacity in Linux has been adapted from a solution posted by Steven Jay Cohen which works in Mac OSX. Cohen’s written a short piece of code that runs in AppleScript, to execute the correct keystrokes to allow non-destructive punch & roll in Audacity on a Mac. A bit of googling will also locate scripts that will achieve similar results using “AutoHotKey” on Windows computers. My solution for linux makes use of a powerful macro utility called “autokey”, which runs scripts in the python programming language.
Here’s how to obtain punch and roll in Audacity on an Ubuntu/Debian linux computer:
1. Install autokey. On a gnome-ubuntu machine, from the command line run:
sudo apt-get install autokey-gtk
2. From the desktop, launch the program menu, then Accessories, AutoKey. This should open the Main Window of autokey, and also place the autokey icon, a capital “A”, in your program tray.
The main window looks like this:
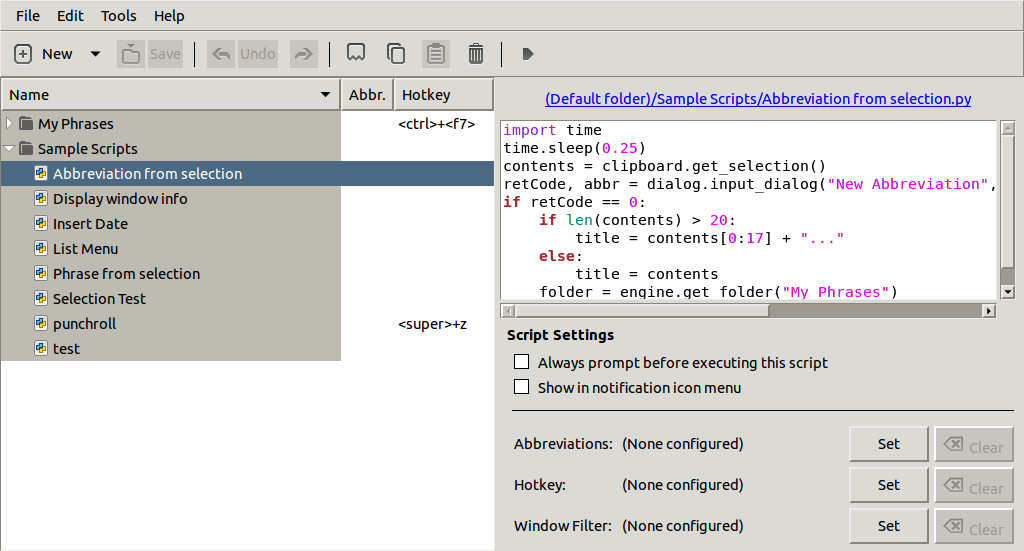
Now you are going to add a new script to the existing library you see on the left side of the main window. Do these:
1. Click where you see “+New”, choose Script from the menu, then give your script an appropriate name in the dialogue box. I called mine Punch&Roll.
2. Notice on the right side the box where you will input and edit your script. It’s marked # Enter script code:
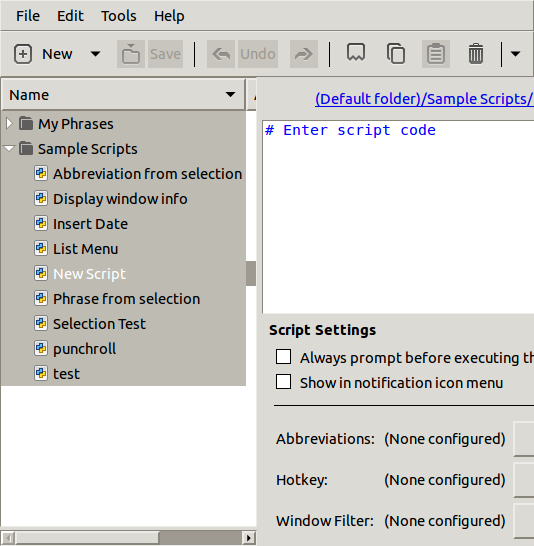
blogYou will be pasting the code right below where you see:
# Enter script code
For those of you unused to working with programs, understand that where you see a hashtag (#) at the beginning of a line, the computer ignores that line when running the program. If you are modifying this script to troubleshoot it, you could insert a hashtag at the start of a line to remove it temporarilly from the program, or to create a note for yourself about what the next line is supposed to do.
Here’s the script that works for me. It sets 3 seconds of pre-roll:
## Autokey script to enable Non-Destructive Punch&Roll
##in Audacity using AutoKey.
# BEGIN SCRIPT
keyboard.send_keys(“<shift>+k”)
keyboard.send_keys(“z”)
keyboard.send_keys(“<ctrl>+x”)
keyboard.send_keys(“<enter>”)
keyboard.send_keys(“<ctrl>+b”)
keyboard.send_keys(“?”)
keyboard.send_keys(“<enter>”)
keyboard.send_keys(“<enter>”)
keyboard.send_keys(“<up>”)
keyboard.send_keys(“<enter>”)
keyboard.send_keys(“<ctrl>+v”)
keyboard.send_keys(“<enter>”)
keyboard.send_keys(“<up>”)
keyboard.send_keys(“<enter>”)
#The number of “,” below sets 3 seconds of pre-roll.
keyboard.send_keys(“,”)
keyboard.send_keys(“,”)
keyboard.send_keys(“,”)
#Below, (” “) encloses one press of the space-bar.
keyboard.send_keys(” “)
#Number for time.sleep below should equal number of (“,”).
time.sleep(3)
keyboard.send_keys(“<shift>+a”)
#Delay for sleep below makes resume-record work.
time.sleep(1)
keyboard.send_keys(“<shift>+r”)
#END OF SCRIPT
After copying this into the script editing box in autokey, do three more steps:
1. Set a hot key for the script, by clicking on the button below the script marked HotKey….Set. Then in the dialogue box that opens, click on “Press to Set”. Choose a hot-key combination that doesn’t conflict with any other program or function: I recommend a combination of the <super> key (also called the <windows> key) and the “z” key. So press and hold <super> and then press “z”. Then press Ok. You should see <super>+z has been set as your hot key.
2. It’s wise to set a Window Filter, so that your hot key will only be activated within Audacity. Where it says Window Filter, press Set. In the dialogue box where it says “Regular expression to match”, type in Audacity.Audacity , just like that.
3. Lastly, save your work: Click up above where it says Save, or simply press Ctrl-s.
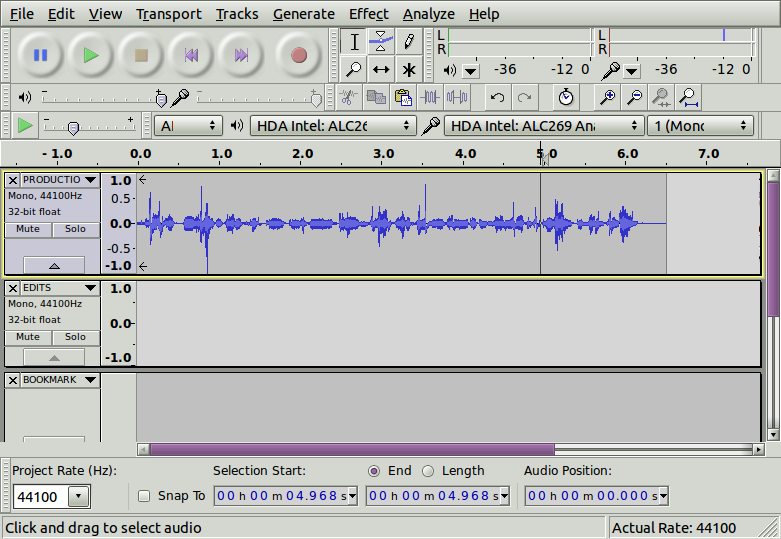
Now, to use “punch and roll”, you need to set up Audacity very specifically for the script. It expects you will have two mono tracks above a label (bookmark) track. Audacity will launch a new track as soon as you begin recording, so I do these steps to get started:
1. Make sure AutoKey is running in the background (the “A” shows in the tray below on the right side). Now launch Audacity, and make a short recording of 5-8 seconds.
2. Press “Ctrl-Shift-n” to make a second mono track below the first.
3. Press “Ctrl-b” to make the label track.
The top-most track is your production track. The next one down is your Edits track and will accumulate your saved mistakes as you stop, set, and then punch/roll to fix “flubs” on the fly. It should look something like this:
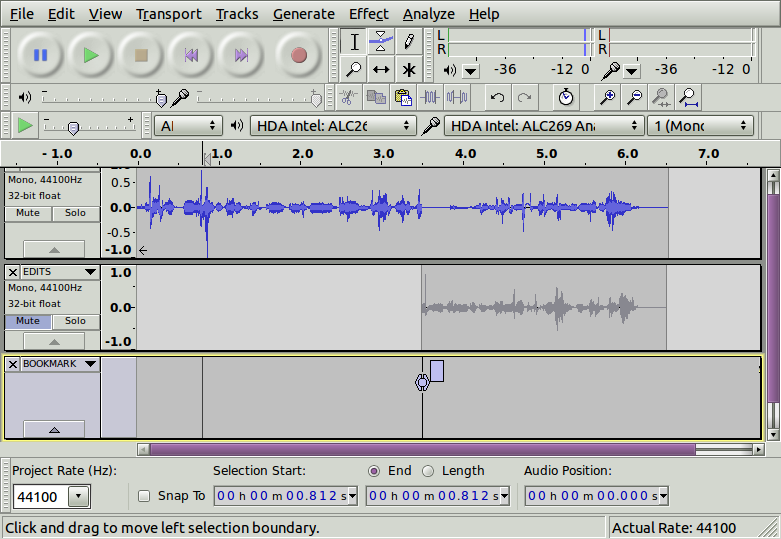
To try it, you need to start with the time-marker set within the short piece of audio you recorded to launch the production track.
1. Put it near the end, but not all the way at the end.
2. Press <super>+z, and you will see the time marker jump back 3 seconds, play those three seconds, and then append a new recording to the production track as it reaches where you started.
You will also notice that all audio AFTER your start point will have been moved to the second audio track, where it will be saved, in case it’s needed to fix something. Here’s what it should resemble:
So there you have it! Non-destructive punch and roll for Audacity in Linux. My deep appreciation to Steven Jay Cohen for his excellent post explaining this process for Macs, without which this technique would still be a mystery to me.